
[Spring] 스프링 입문 웹 개발 기초(6)
MVC와 템플릿 엔진 적용해보기
먼저 HelloController에 가서 새로운 걸 작성해준다.
@GetMapping("hello-mvc")
    public String helloMvc(@RequestParam(value = ㅣ"name") String name, Model model){
        model.addAttribute("name", name);
        return "hello-template";
    }
전에 설명했듯이 localhost:8080/ 이 뒤에 따라오는 주소가 GetMapping(””) 안에 들어오는 것이다. hello-mvc로 해주겠다.
이번에는 값을 입력받아서 작성할 것이기 때문에 @RequestParam을 사용해준다.
윈도우 사용자는 @RequestParam에 Ctrl + P를 하게되면 파라미터 정보를 알 수 있다.

이제 여기에 맞춰서 value값을 넣어주고 required는 디폴트값이 true기 때문에 생략해주어도 된다.
마지막으로 return “hello-template”으로 작성했다면 이제 hello-template을 만들러가보자.
templates에 hello-template.html파일을 생성해주자.
<html xmlns:th="http://www.thymeleaf.org">
<body>
    <p th:text="'hello ' + ${name}">hello! empty</p>
</body>
</html>
전에 했던 방식과 비슷하게 생성해주면 된다.
이제 실행해보자
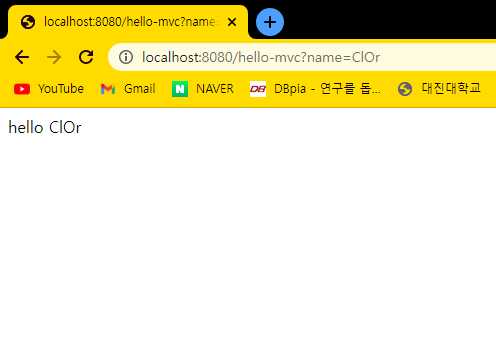
name 값을 넘겨주기 위하여 hello-mvc 다음 ? 를 집어넣어주고 name값을 입력해주면 아래와 같은 방식으로 hello ClOr이 출력된다.
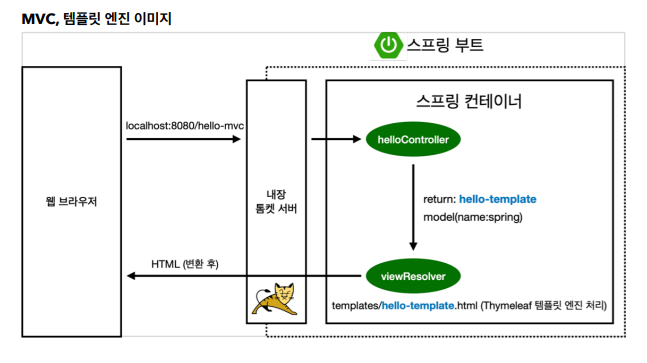
동작방식은 아래 김영한님 자료에서 첨부하겠다.
Leave a comment