
[Spring] 개발 과정 Error 해결 모음
Error
@RequestBody로 Dto를 받고 Mulitpartfile 했더니 스웨거에서 오류로 인하여 파일 넣는 칸이 사라짐(String 하나 덜렁 있음)
⇒ 멀티파트파일은 리퀘스트파람이라서 리퀘스트바디 같이 못씀!
해결방법 : 멀티파트파일 그냥 Dto에 넣고 컨트롤러에 Dto 파라미터 앞에 @ModelAttribute 사용해주자.
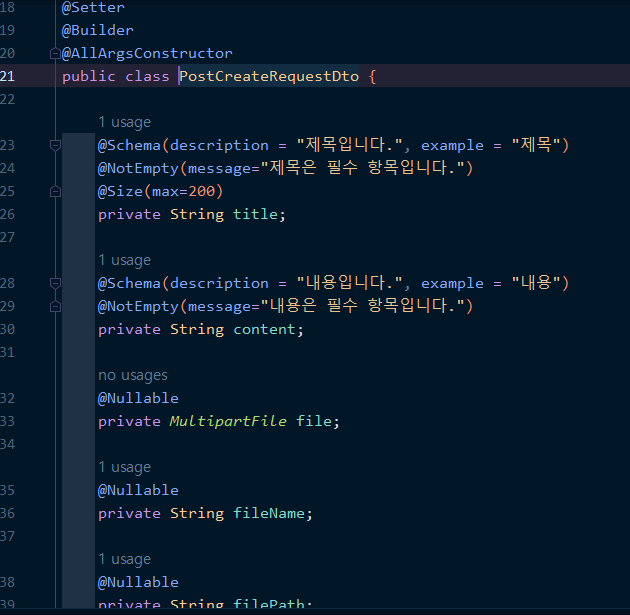
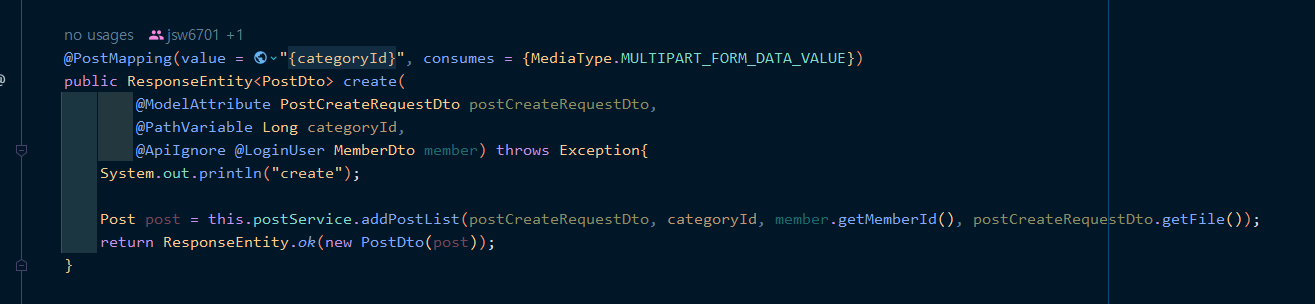
그리고 파일 넣는 게 안보일수도 있는데 그건 스웨거에서 파일 넣으려면 @PostMapping쪽에 consumes = {MediaType.MULTIPART_FORM_DATA_VALUE} 추가해주자
그러자 앞의 {categoryId} 가 에러가 떴는데 그럴 떈 value = {categoryId}로 바꿔주자
org.springframework.context.ApplicationContextException: Unable to start web server; nested exception is org.springframework.boot.web.server.WebServerException: Unable to start embedded Tomcat
| → 기본적으로 3306 포트를 사용중일때 SQL 오류가 나는 건 알고 있어서 흠 이번에도 비슷한 건가 보다 하고 netstat -ano | findstr 포트번호 를 사용해서 3306포트를 사용중인지 확인했는데 없어서 MySQL을 껐다가 켜보기도 하고 했는데 안되었다… 머지 싶었는데 |
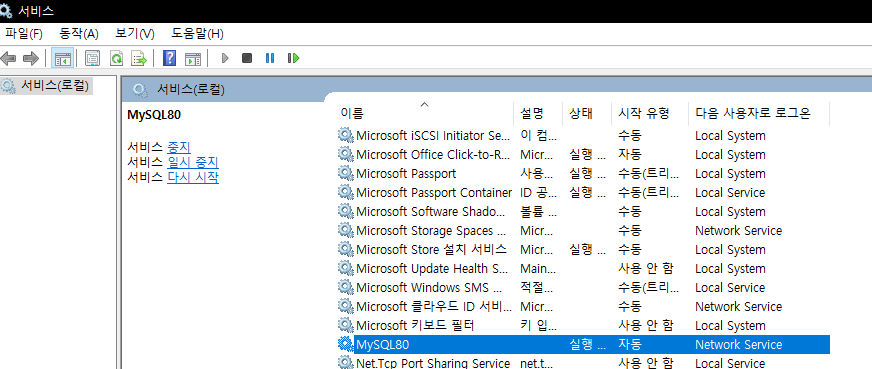
서비스 들어가서 MySQL80 우클릭해서 직접 시작을 눌러주니까 작동했다…
이번 에러는 4일 걸려서 해결했는데 되게 간단해서 팀원도 허무하게 생각했고 아직 머리의 논리회로가 Spring을 하는 것이 아니고 그냥 마구잡이로 개발하고 있구나 싶었다….
에러는 뭐였냐면 우리의 기능 개발에 좋아요수와 조회수가 있는데(자료형은 Long) 그 컬럼의 값이 자꾸 Null로 들어와서 고생을 잔뜩 했다,,,
해본 방법으로는 @ColumnDefault를 사용해서 0으로 해보기도 하였고 Service 계층에서 직접 Null값이 들어오면 0L을 넣어주고 if문을 사용해서 처리도 많이 해주고 set을 사용해 entity에 0을 넣어주기도 하고 많은 것을 했는데 지속적인 Null이 들어왔다…
해결방법
- 우리는 Controller에서 RequestDto를 사용하여 프론트에서 값을 넣어주고 그것을 이제 사용하는데 Entity에서 죽어라 바꿔봤자 영향이 가지않았던 것 같다…앞으로 값을 줄 때는 무조건 Dto에…
스웨거에 멤버 엔티티값을 전부 넣어줘야 게시글 생성 수정을 할 수 있던 문제..
오래 걸렸지만 결국 그냥 @ApiIgnore 어노테이션을 사용하면 되는 것이였다…
스웨거에서 페이징처리 할 때 그냥 사용하면 스웨거가 어라 이거 머임? 한다… 그래서 SwaggerConfig에서 설정해줘야한다.
@Getter
    @Setter
    @ApiModel
    static class Page {
        @ApiModelProperty(value = "페이지 번호(0..N)")
        private Integer page;

        @ApiModelProperty(value = "페이지 크기", allowableValues="range[0, 100]")
        private Integer size;

        @ApiModelProperty(value = "정렬(사용법: 컬럼명,ASC|DESC)")
        private List<String> sort;
    }
로그인이 안되는 오류 세션아이디나 로그인 정보가 전달 자체가 안되는 오류가 생겼었다.
#원래 코드
spring.security.oauth2.client.registration.google.client-id=406374438067-6aeqcg7oojmjbekff6dbnh5ocr6t1f2g.apps.googleusercontent.com
spring.security.oauth2.client.registration.google.client-secret=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
#spring.security.oauth2.client.registration.google.redirect-uri=https://waffle-eungae-frontend.vercel.app/login/oauth2/code/google
spring.security.oauth2.client.registration.google.scope=profile,email
원래 코드는 세번째 줄에 주석 처리한 것 처럼 리다이렉트 URI를 사용하여 프론트 배포된 주소로 리다이렉트 주소를 걸어놨었다. 하지만 이것이 문제였는지 주석처리를 하니 잘 돌아갔다.
그래서 코드를 다시 수정했다.
spring.security.oauth2.client.registration.google.client-id=406374438067-6aeqcg7oojmjbekff6dbnh5ocr6t1f2g.apps.googleusercontent.com
spring.security.oauth2.client.registration.google.client-secret=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
#spring.security.oauth2.client.registration.google.redirect-uri=https://waffle-eungae-frontend.vercel.app/login/oauth2/code/google
spring.security.oauth2.client.registration.google.scope=profile,email
google.redirect-uri=https://waffle-eungae-frontend.vercel.app/login/oauth2/code/google
리다이렉트 주소를 주석처리하고 google.redirect-uri 로 주소를 넣어주고
import lombok.RequiredArgsConstructor;
import org.springframework.beans.factory.annotation.Value;
import org.springframework.security.core.Authentication;
import org.springframework.security.web.authentication.AuthenticationSuccessHandler;
import org.springframework.security.web.authentication.WebAuthenticationDetails;
import org.springframework.stereotype.Component;

import javax.servlet.ServletException;
import javax.servlet.http.Cookie;
import javax.servlet.http.HttpServletRequest;
import javax.servlet.http.HttpServletResponse;
import javax.servlet.http.HttpSession;
import java.io.IOException;

@RequiredArgsConstructor
@Component
public class MyLoginSuccessHandler implements AuthenticationSuccessHandler {
    @Value("${google.redirect-uri}")
    private String redirectUrl;

    @Override
    public void onAuthenticationSuccess(HttpServletRequest request, HttpServletResponse response, Authentication authentication) throws IOException, ServletException {
        response.sendRedirect(redirectUrl);
    }
}
그리고 MyLoginSuccessHandler 클래스에서 설정한 Url 값을 받아서 리다이렉트로 날려주었다…
import com.example.waffleeungaebackend.config.login.CustomOAuth2MemberService;
import com.example.waffleeungaebackend.config.login.MyLoginSuccessHandler;
import com.example.waffleeungaebackend.entity.Role;
import lombok.RequiredArgsConstructor;
import org.springframework.context.annotation.Bean;
import org.springframework.context.annotation.Configuration;
import org.springframework.security.config.annotation.web.builders.HttpSecurity;
import org.springframework.security.config.annotation.web.configuration.EnableWebSecurity;
import org.springframework.security.web.SecurityFilterChain;

@RequiredArgsConstructor
@Configuration
@EnableWebSecurity
public class SecurityConfig  {

    private final MyLoginSuccessHandler myLoginSuccessHandler;

    private final CustomOAuth2MemberService customOAuth2MemberService;

    @Bean
    public SecurityFilterChain filterChain(HttpSecurity http)throws Exception{
        http
                .csrf().disable()//csrf 공격을 막아주는 옵션을 disalbe, rest api같은 경우에는 브라우저를 통해 request 받지 않기 때문에 해당 옵션을 꺼도 됩니다.
                .cors()
                .and()
                .authorizeRequests(authorize -> authorize
                        .antMatchers("/","/css/**","/js/**","h2-console/**","/profile").permitAll()
                        .antMatchers("/api/v1/**").hasRole(Role.GUEST.name()) // 엔드포인트는 유저 역할을 가진 사람만 허용가능
                        )
                //.formLogin()
                //.loginPage("/login")
                //.defaultSuccessUrl("/")  //로그인 성공후 리다이렉트 주소dd
                .logout(logout -> logout
                        .logoutSuccessUrl("/")) //logout 요청시 홈으로 이동 - 기본 logout url = "/logout"
                .oauth2Login() //OAuth2 로그인 설정 시작점
                        .userInfoEndpoint() //OAuth2 로그인 성공 이후 사용자 정보를 가져올 때 설정 담당
                        .userService(customOAuth2MemberService)
                        .and()
                .successHandler(myLoginSuccessHandler); //OAuth2 로그인 성공 시, 작업을 진행할 MemberService

        return http.build();
    }
}
그리고 SecurityConfig에서 로그인이 성공하면 myLoginSuccessHandler로 실행하게 하였다.
Leave a comment